Without a doubt, one of the most popular parts of your computer is the GPU. The heat must be dealt with immediately to avoid burning your system. Water cooling can also be a suitable option for GPUs.
You must eventually choose whether to get a graphics card with a waterblock installed or a standard card and install the waterblock yourself if you plan to build a liquid-cooled PC with a full custom loop. A GPU with a waterblock already installed is guaranteed to maintain its warranty. However, doing it yourself will give you greater satisfaction. I’ll discuss how to install waterblock GPU.
Reasons To Cool the GPU With A Water Block
There are billions of distinct transistors in a GPU. Several tiny switches can be switched on or off. A GPU operates when these switches change states tens of thousands of times in seconds. Of course, this uses a lot of electricity, and in the end, it produces a lot of heat.
Your GPU and PC may suffer damage if you don’t promptly address the heat. Water cooling comes in handy in this situation. Typically, fan cooling circulates the heat and disperses it to lower the GPU’s temperature. But this approach has two drawbacks:
- First, the air does not effectively spread heat.
- Additionally, fan cooling produces a lot of noise.
- As opposed to fan cooling, water cooling is a far more effective and efficient technique.
- Water effectively distributes heat because it has a higher thermal conductivity than air.
- People prefer water coolers because they don’t make noise and can prevent the GPU from reaching dangerous temperatures.
How To Install Waterblock GPU?(6 Easy Ways)
If you are worried about the installation of waterblock. Then follow these steps about how to liquid cool GPU:
1) Check Your Graphics Card
You must test your graphics card as soon as possible. Most of the time, switching from the stock cooler to the water cooler does not void the manufacturer’s warranty. However, you should still utilize some benchmarks first to run and assess your GPU’s performance before you make the ultimate decision.
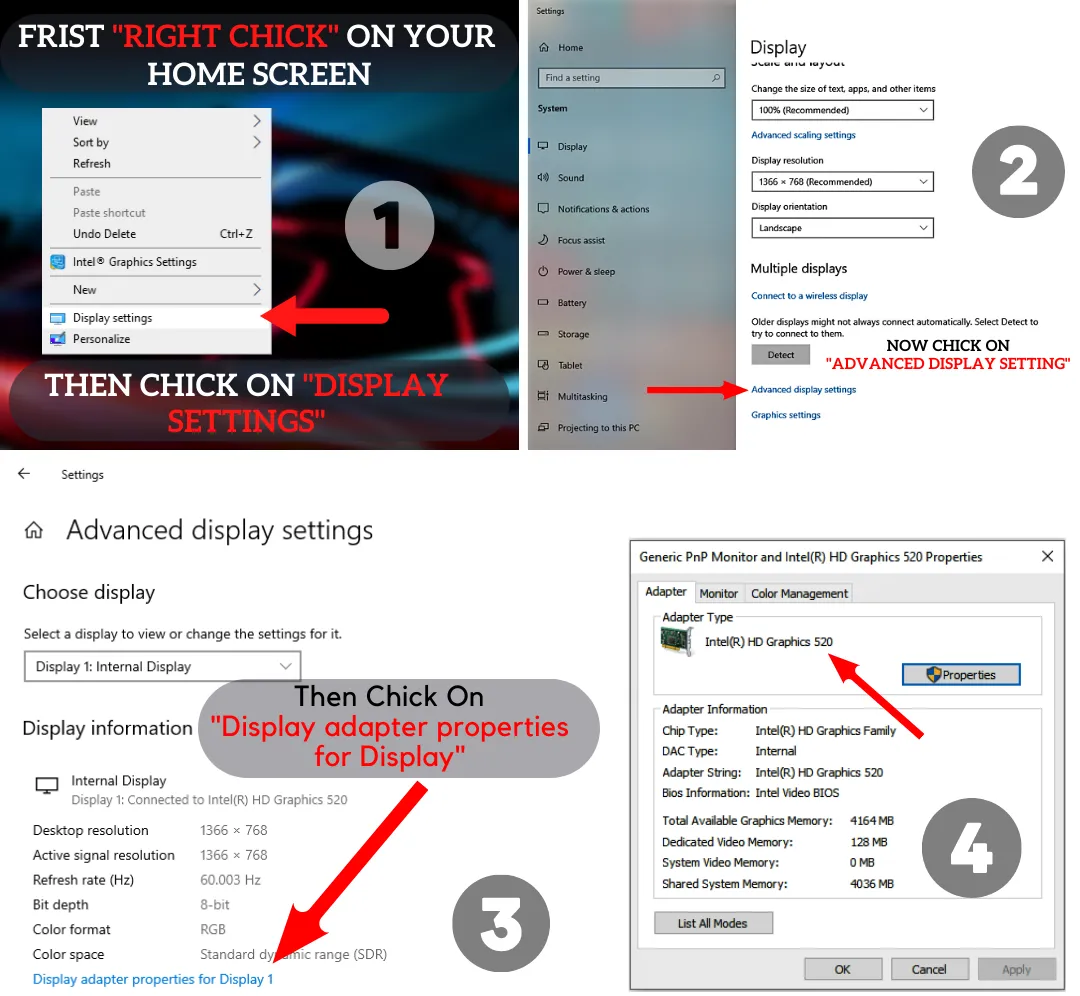
In this situation, you can greatly benefit from tools like GPU Z or MSI Afterburner. The temperature will significantly drop with liquid cooling, and your GPU’s performance will improve.
2) Taking Your Graphics Card Apart
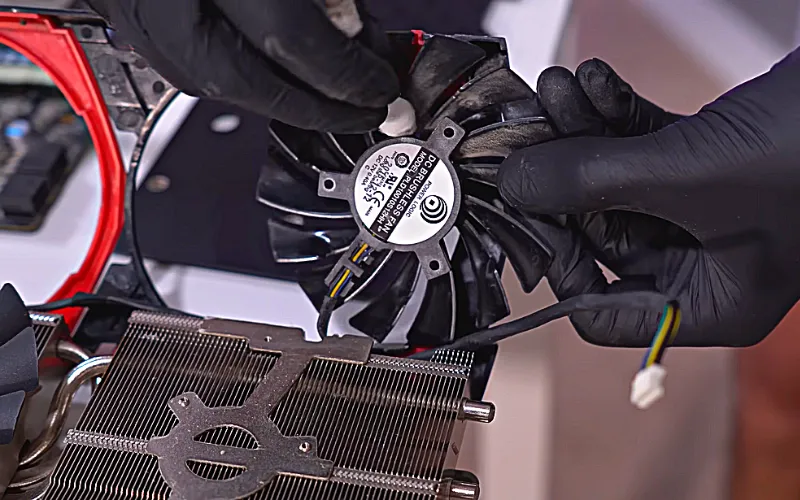
The disassembly of the graphics card is the next step in the procedure. Although it can seem a little challenging, it’s not. Simply follow the manufacturer’s directions since each GPU has a different cooling system setup.
You must look for various screws close to the EVGA card and then take each one out one at a time. Place the screws safely so you can subsequently replace them without losing them.
Again, it depends on the manufacturer because some coolers come out easily after removing all the little screws, while others need a little prodding. Furthermore, the cooler is likely secured with thermal glue if there are no screws. You must apply heat and slowly slide the cooler to remove that glue. It will quickly come off.
3) GPU Cleaning
You’ll probably discover a lot of dust, debris, and thermal glue on the GPU when you remove the cooler. To properly clean the GPU, you’ll need Q-tips, 99% isopropyl alcohol, and a lint-free cloth.
You’ll probably notice that even the nearby components have thermal paste and grime when you remove the cooler. Along with the GPU, you ought to clean that as well. Look for a cooling plate often located between the cooler and the GPU. Remove any you find right away.
4) Take A Moment to Breathe and Admire Your Graphics Card
You don’t get to install a water cooler by disassembling the GPU daily. Therefore, when you sit down for the first time, take a moment to breathe, admire the graphics card, and then tidy up your workspace.
You need to prepare your water block for installation currently. You should execute a test on the water block you intend to purchase to ensure you get the proper one. Use the water block’s instruction booklet to learn how to install it on your specific GPU model.
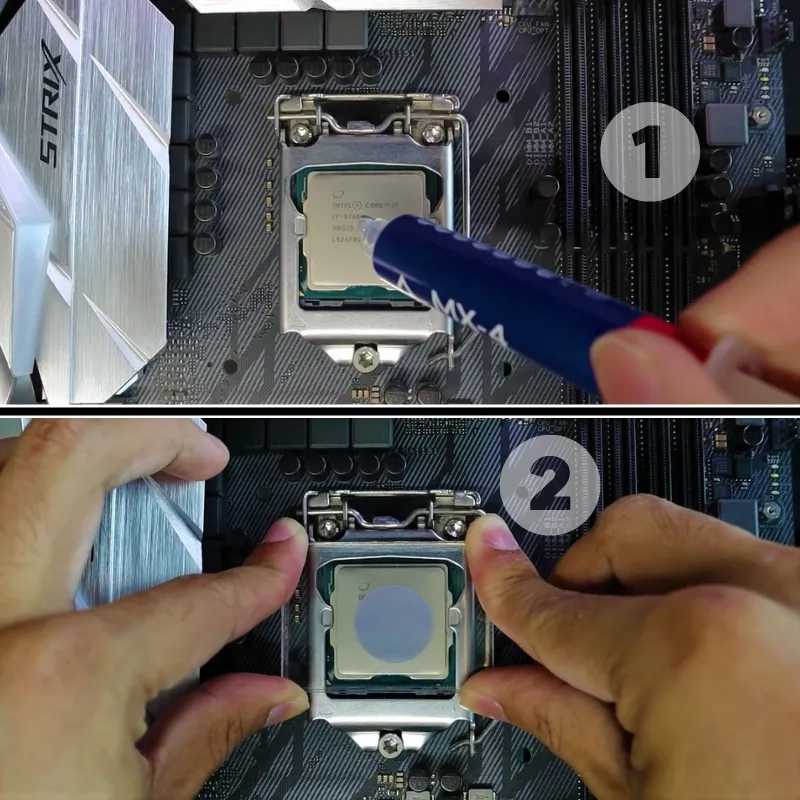
5) Cut and Use Thermal Paste and Pads
A little thermal paste will also need to apply to the card. After installing the thermal pads, you must use a small paste to the center of the card, which typically comes with the waterblock. Tightening the water cooler against the GPU will automatically spread, so you don’t need to worry about it.
6) Set the Waterblock
The GPU water block is only attached to the GPU in the final step of the process. Just be sure to level it with your card first so that it can push the card a little and spread the thermal paste. Once finished, you can simply replace each screw in its original location, and you’re ready to go!
How To Install Liquid Cooling On GPU?(4 Best Ways)
Follow these steps for the exact procedure to cool this graphics card using liquid:

1) First Step for The Installation
The stock cooler for the graphics card will take off as the first step. Second, a sort of backplate is good for holding the liquid cooling. I measured the distance between the anchors for the screws on the rear of a graphics card to create a 3D component that would fit.
If I set the density to 100%, it will take between 6 and 8 hours to print one of these components, which is necessary to obtain a hard and rigid piece. Then, I’ll position that component on the back of the illustration to make sure it fits, mark the locations of the drilling holes, and create room for the flanges to be added later.
2) Keep Your Other Components Safe
There are a few tiny protrusions in the liquid-cooled CPU block for the Intel or AMD adapters, but they got in the way of the graphics in this instance. Sand that area to make room for the graphics card as a fix. Once everything was in place, the assembly could begin. I attached the backplate to the graphics card’s back. Install a safeguard to prevent the graphic card from ceasing to function
3) Take Care of Assembling
The next stage is to pass the flanges; to hold the CPU block on the graphic, I will need two or three joined together. As previously mentioned, avoiding the pressure that the flanges exert is best. To prevent the graphic from moving, I lay thermal paste, the CPU block on top, and feed the flanges through one another in the shape of an X.
4) Testing the Temperature
With this configuration, the GPU temperature maintains above 60 degrees, which is a respectable temperature. It did not exceed 60 degrees while undergoing the OCCT test either. Temperatures must keep within this range during the gaming test.
How Can I Cool My GPU and CPU?
If your CPU and GPU get hot. You need to cool it down. These methods will help you with CPU and GPU water cooling:
1) Keep Windows and Vents Away from Your System
Is your computer in a particularly warm location? Ensure your system isn’t located close to a heat vent or in a place where the temperature is sensitive (i.e., near a window). Frequently, all it takes to keep your system cool is a simple location change.
2) Give Your System Some Room to Breathe
Examine where your computer places and remove anything that prevents airflow. You should leave two to three inches of space around your computer on all sides for optimum efficiency. Additionally, check to see if your computer desk confines your system inside a locked cabinet or drawer. Your system is at a higher risk of overheating in a small area.
3) Choosing an AIO System
Find GPU water cooling AIO that works with your card if you choose an all-in-one kit. The size of the fans and the space you have available should also consider. Larger AIO systems will be able to circulate more air and maintain a cooler temperature than those with smaller fans.
How Do You Watercool A PC?
What is necessary to get started if you are new to liquid cooling? The four components of a typical water cooling system are as follows:
- A radiator that uses fans to transfer heat from a liquid to the atmosphere.
- Utilizing water blocks convert heat into liquid.
- A pump moves the liquid.
- A reservoir for storing extra coolant and automatically removing air from the liquid.
Up to roughly 90 degrees Celsius, most GPUs can function normally. Beyond that will result in thermal throttling, slows down the GPU clock to keep the graphics card below dangerous temperatures. Thus, a 90°C operating temperature regards as excessively high.
Many or all components required to finish a custom PC water cooling loop include water cooling kits, which come as a single unit.
To prevent particulate buildup and guarantee optimum thermal performance. I advise changing the fluid in your custom cooling system once every 12 months.
Hard drive water blocks offer to cool a single or twin hard drive. It is possible to sandwich the coolers between two hard drives, one of which can be put upside-down.
You will need a few components, including a water block, pump, radiator, fittings, cooling liquid, soft/hard tubing, and more, to establish a water cooling loop in your system that cools your GPU. You might have to pay over $500 for these things. Sometimes, just the water block costs more than $300.


