Your computer will boot up quicker, transmit data quicker, and have a better bandwidth with SSDs. Faster SSDs can process data at the ultra-speeds required in today’s commercial environment, especially when running programs like operating systems that access enormous volumes of data.
If a new SSD not showing up in BIOS, you’re not alone; many people face this issue. There are numerous potential causes for this. Fortunately, there is a remedy for each one. Read this guide, save time and money, and know how to fix an SSD not detected in BIOS.
Why is My SSD Not Detected in BIOS?
Know the most frequent reasons why an SSD suddenly not detected:
- The data and power SATA cables are defective or not entirely connected.
- The BIOS settings don’t have the SSD driver activated.
- The pins on the motherboard connector have a physical issue.
- The drive itself is faulty, defective, or not working properly.
- A drive letter does not allocate, or the SSD drive has no format.
How To Tell If Your System is Not Recognizing Your SSD?
My experience has shown me that occasionally a newly installed SSD will appear in the devices tab rather than the BIOS.
- Type Devices and Printers into the search bar in the start menu of Windows.
- Select hardware by doing a double-click on the device with the PC/laptop icon.
- When you reach the Type area, scroll down the selection until you see Disk drives.
- Check to see if the SSD you just plugged in is in that list or not.
What To Do If the BIOS Won’t Detect SSD?
Here are the ways to fix if your computer not recognizing SSD:
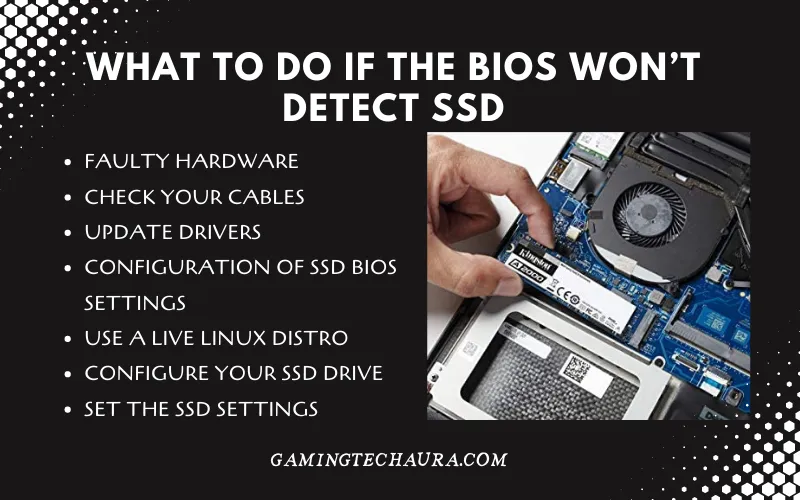
1) Faulty Hardware
If your pc not detecting SSD, then BIOS may be unable to recognize your SSD due to hardware issues. Check them out to ensure that your SSD hardware and associated ports function well. You can also try a different SSD port to see if the BIOS can recognize it. Don’t worry if the hardware functions flawlessly, but you still have issues. Go on to the following resolution.
2) Check Your Cables
If you discover that the SSD was plugged into the incorrect motherboard connector, you can avoid spending hours troubleshooting. It’s possible that the SATA cable was defective or that the contact was incomplete.
Physically inspecting the connector cables connecting the SSD to the motherboard and power supply will be aided by this procedure. They often surround the motherboard’s edges on the bottom or right.
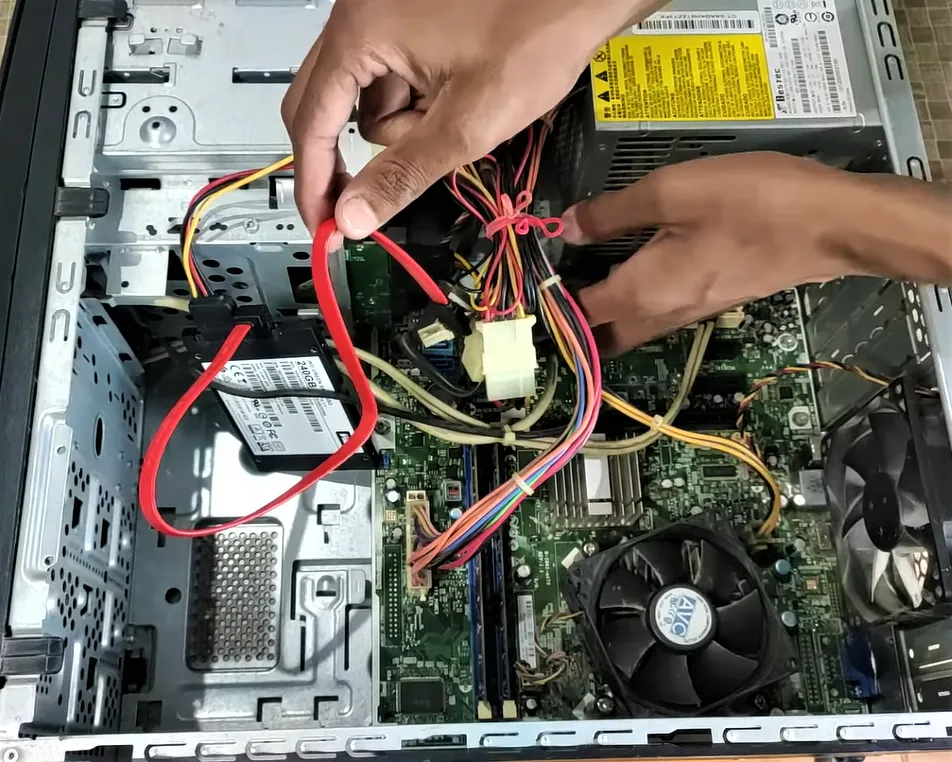
This method helps you to fix the problem if the solid state drive not recognized due to cables. Let’s dive in!
- Remove the SSD cable from the motherboard.
- Clean the motherboard connector pins and the ends of any SATA cables.
- Verify that your PSU has sufficient power to accommodate an additional hard disc.
- Always force the SATA cables into position until they click or snap.
- Make sure the cables don’t have any sharp bends or folds.
- Make sure the motherboard pins aren’t crooked.
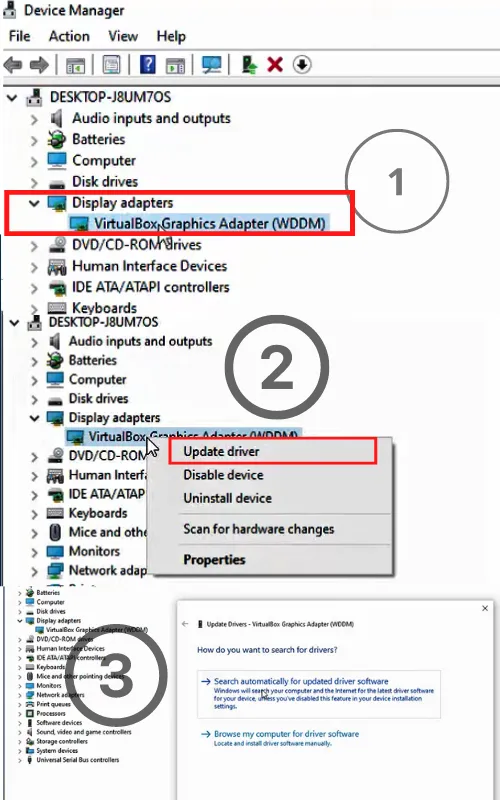
3) Update Drivers
Updating drivers would fix the issue. The device wouldn’t be able to recognize the SSD in BIOS if it had an out-of-date or missing driver. Manually upgrading the drivers is one approach to fixing it.
In this case, you can only go to the manufacturer’s website and locate the appropriate hardware device driver. Download the most recent driver version, then successfully install it on your device. Ensure that the download driver update is compatible with the Windows operating system.
Therefore, if you experience a problem starting your device and it displays an error message such as solid-state drive not recognized or bios not detecting SSD, it may be caused by a problem with the drive that holds the system data.
This error may appear in this situation due to a defective drive, bad sectors, a corrupted partition, or any physical damage to the disc. Additionally, it could cause by a poor or sloppy SATA cable connection between the drive and the apparatus. A solid-state drive may not identify if the controller driver is disabled in the system settings or if the device’s drivers are not up to date.
4) Configuration of SSD BIOS Settings
Configuring the SSD settings in BIOS is another technique to resolve the bios not detecting SSD issues. Usually, it occurs if the drive has not set the SATA controller settings. Each brand has its settings. Take Lenovo as an illustration. These are the steps to set up the controller drive:
- Restart your device to start the procedure. Press the F2 key on the keyboard when the start screen shows.
- Start the configuration in the config after pressing F2.
- Select the serial ATA checkbox in the following window, then press Enter to proceed.
- The SATA controller mode choice can find in the serial ATA window. IDE compatibility mode should choose.
- When finished, save the changes, and restart the device to launch the BIOS.
5) Use A Live Linux Distro
Several Live Linux options may use to check whether your SSD is recognized. You should check if your SSD is displayed using alternatives like Ubuntu, Porteus, and Busenlabs.
6) Configure Your SSD Drive
It is conceivable that your SSD has a fault that stops it from being identified in your BIOS because of a corrupted file or a poorly installed application. It is safe to format it, but you must save your data to another drive because this operation will delete all stored data. All you must do to format your SSD drive is the following:
- Disk Management can access it by right clicking the Windows icon.
- Now select the Format by right clicking the space next to the name of your SSD disc.
- Your drive is now clean, and the BIOS should recognize it again.
7) Set the SSD Settings
You might need to adjust your SSD settings if your BIOS menu does not list the SSD. The SATA controller is the physical interface that connects the motherboard to the hard disc. You might try switching the SATA controller mode if the BIOS cannot recognize your SSD.
Check for similar settings in your manufacturer-specific BIOS menu since each manufacturer’s BIOS menu differs. To set the SATA controller parameters:
- You can access the BIOS menu by restarting your computer and pressing the proper function key.
- Choose one of the following configurations: Storage Options > Serial ATA > SATA Configuration.
- IDE Compatibility Mode should choose.
- Restart your computer after saving modifications.
- After starting Windows 10 on the SSD, your BIOS should recognize it.
How Can I Make an SSD My Primary Hard Drive?
The primary drive is the computer’s disc to load up any installed operating system, whether it be Windows, Mac, or Linux. When installing many hard drives at once, a mismatch is more likely since the motherboard finds it difficult to determine which one contains an operating system.
- The BIOS/UEFI menu, and then
- Go to the section with the storage devices and hard drives.
- Look for the Boot Priority option or a comparable selection.
- Set the SSD to position one or, if necessary, adjust it.
It’s crucial to remember that the BIOS did not keep on the primary hard drive (HDD) or solid-state drive of your computer (SSD). The majority of BIOSs store data on flash memory. They got separated from the other files on the computer.
Move the mouse to the lower left corner of your desktop in Windows 8 and later, right-click the Start button, and then choose Disk Management. A pop-up will show when Disk Management launches and ask you to initialize the SSD. After choosing the GUID partition table, press OK.
Yes, an SSD or HDD is not required to boot in BIOS.


