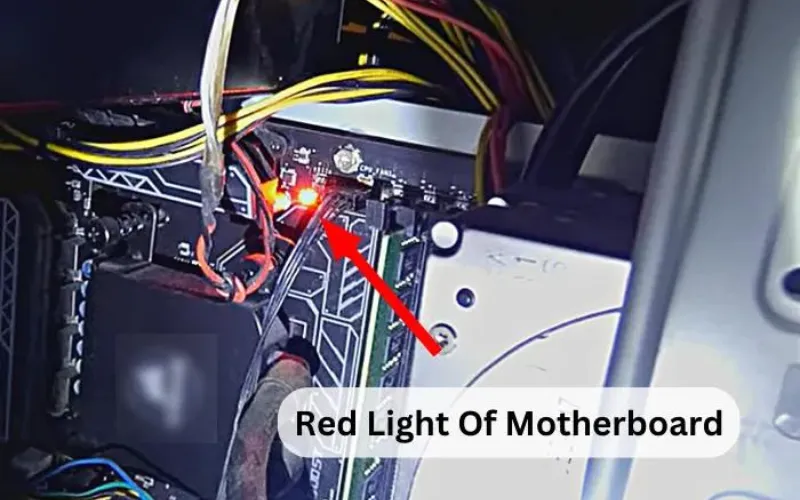
A red motherboard light indicates a problem with the motherboard. It results from malfunctioning hardware or improper connections between the CPU, RAM, and GPU. A red led light on the motherboard might also be caused by a dead CMOS battery or a boot failure.
The Red light on the motherboard typically appears when your system has a problem. The motherboard flashes a red light when the hardware is missing or not functioning properly. However, the Motherboard displays a red light for certain users in various situations.
Red light may appear for some when there is a RAM issue and for others when there is a hardware problem. The red light may blink intermittently with buzzer sounds or display loss. Depending on the system, each of them can mean a different thing. Let’s explore how to Fix the solid red light on motherboard.
What Does A Red Motherboard Light Mean?
The red light on motherboard when gaming indicates several problems, including loose connections, incorrect seating, and significant hardware damage. Sometimes you will need help seeing the display even when the red light blinks and beeps.
These issues demonstrate that the system has some serious problems that must fix.
What Does the Red Light Indicate on the Motherboard?
Suppose you have a problem with the red light on motherboard ASUS. Most modern motherboards contain 4 primary indicators, and each label will have a red light next to it.
Which are:
- BOOT: If a red light is next to the BOOT indicator, the hard drive’s boot devices are malfunctioning. It’s the hard drive where the OS is kept, to be more precise.
- VGA: If the red light on motherboard VGA or GPU indicator is lit in red. That means the graphics card is either not detected or properly placed.
- DRAM: A RAM module not properly placed will have a red light next to the DRAM indicator. The dram red light on motherboard problem is probably visible if the side clamps lockdown on the side of a RAM stick.
- CPU: A red light next to this indicator indicates that the motherboard cannot identify the CPU, which could mean several different things. One of the CPU’s pins may damage, or the CPU may not properly plugin. Another possibility is that the CPU fan is unplugged. Finally, the red light may activate due to a dead CMOS battery.
Related Article: 5 Easy Ways to Fix VGA Light On Motherboard
What Can Cause Boot Failure?
Each motherboard LED identifies the location of the issue but only sometimes identifies it. One of the more frequent causes of the red light on motherboard boot is a problem with the processor.
The following are some causes for the CPU indicator to activate:
- It might need to be seated properly, so the pins might be bent or not plugged in properly.
- It might also imply that the motherboard’s power line is improperly connected.
- The CPU fan cable needs to be fully inserted into the header.
- Dead is the CMOS battery.
- The CPU that you installed is broken.
How Do I Fix the Red Boot Light on Your Motherboard?(6 Simple Steps)
Although the reasons for the red light on your CPU appear severe, most of them can resolve by paying attention to a few things. But don’t panic, and kindly follow the step-by-step methods to have a problem-free system.
1) Reseat Your GPU and RAM
Your system cannot identify RAM if the RAM indicator is red. The RAM needs to be correctly positioned in its location. But occasionally, this can lead to a system error, and the CPU indicator might flame red. It frequently happens because we must wiggle the RAM closer to the slot.
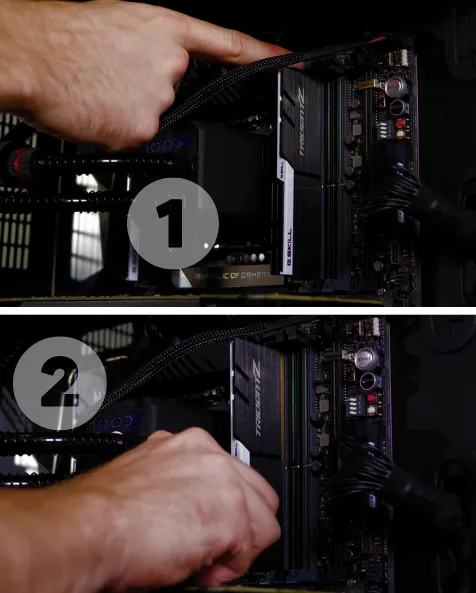
If your system contains two RAMs, the red light may occasionally come on, even if only one is working. Checking the RAM’s functionality is always helpful.
Let’s examine how to test the RAM and reinstall it.
- After disconnecting all the power connections, open your case cover.
- Look for RAM slots on the motherboard.
- Take the RAM out of the slot.
- It should clean with a gentle cloth, including the slots.
- If you have two RAMs, place one after the other.
- Make sure both hinges are in their proper places, and you hear a click.
- Try one RAM module in a slot to see if the issue goes away.
- If not, try installing the RAM in a different slot. Find the offender by performing this on both RAMs.
- Try utilizing the RAM on a functional computer if it needs to fix.
If the RAM appears to be working well, then your RAM slots may be having an issue. The RAM may have been corrupted if the problem occurred on another machine.
2) Check the Power Supply Unit
A specialized cable for powering your processor is one of the numerous connectors on the power supply unit. Since the PSU powers the motherboard, a problem with the PSU may be causing the red CPU light to blink. Another possibility is that the CPU connector coming from the PSU is just broken.
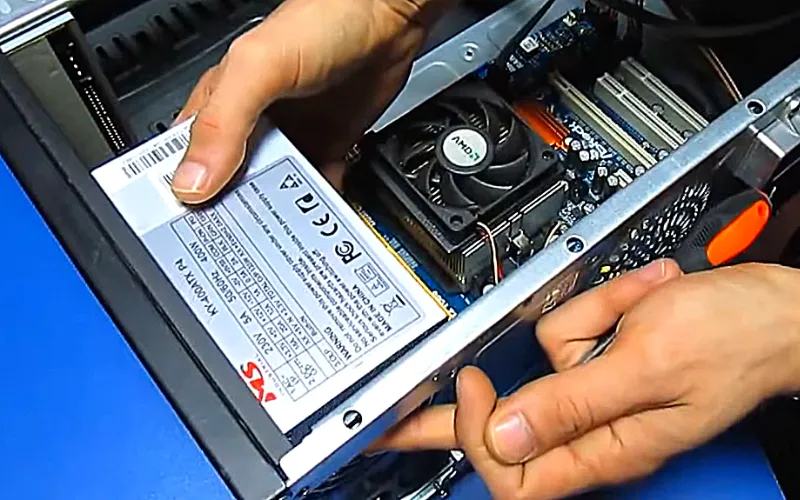
All the power cords coming from the PSU should first reconnect. If the issue still exists, you should verify that the PSU is functioning properly by following the below steps:
- Open the computer’s case and disconnect all connections.
- Remove all the PSU wires that are attached to the motherboard and other devices.
- The PSU must remove from the inside by unscrewing it.
- On a functioning computer, examine the PSU.
- If it doesn’t work, get a new power supply unit, and put it together properly for your system.
- After inserting the PSU and tightening the nuts, reconnect all the connectors. Check to verify whether the issue has resolved.
3) Update or Reset the BIOS
The BIOS settings or a corrupt BIOS are other problems that can cause the LEDs to blink. The firmware known as BIOS instructs your motherboard to communicate with your operating system and hardware. Your computer won’t operate properly if the instruction is destroyed.
There may also be a BIOS issue if the CPU indication or BOOT indicator is illuminated in red. Try resetting your BIOS to default settings first. To reset your BIOS, simply follow the steps listed below.
- Start up your computer.
- As soon as the computer starts, repeatedly press the appropriate key for your system, such as F2, F12, Delete, or Esc, to launch BIOS.
- At the bottom, you will notice the key for the instruction Load Defaults and the instruction itself. Hit the key.
- Locate the Save and Exit options, then choose them by pressing the corresponding key.
- BIOS save-and-exit
- Click OK. The BIOS will reset, and your computer will restart.
- If the method described above does not work, there are several different ways to reset your BIOS settings safely.
You should upgrade the BIOS if resetting the BIOS did not resolve the problem. However, changing BIOS is a dangerous task. Therefore, you must adhere to the safest recommendations when doing so.
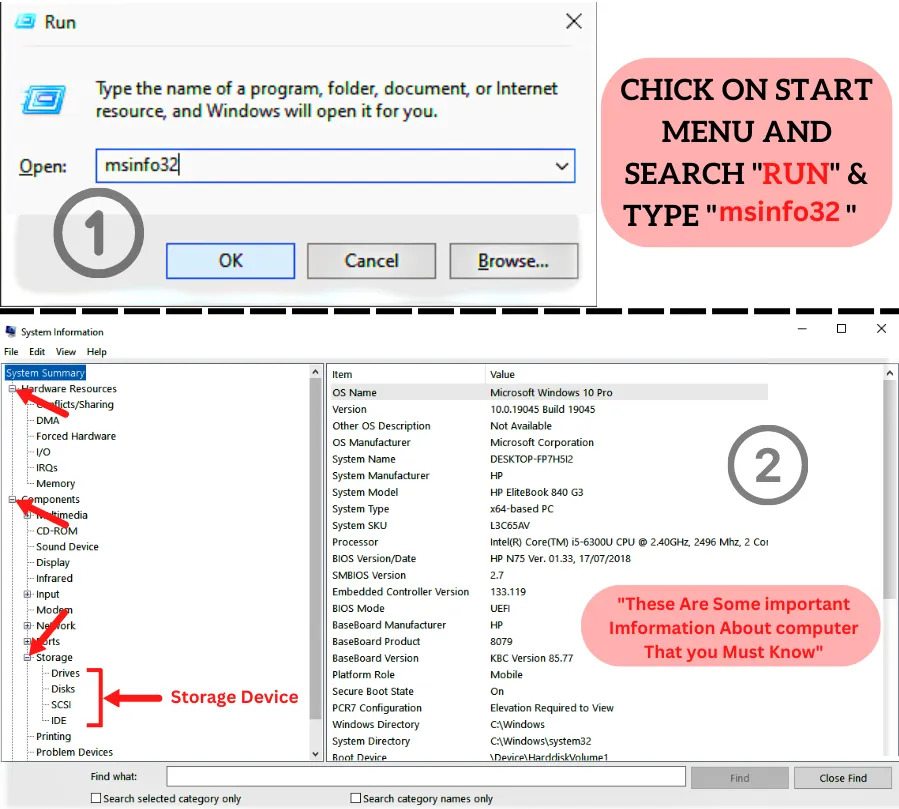
4) Check the Storage Device
You might need your friends’ assistance in this procedure. You should swap out your storage device and recheck the booting procedure. There is an issue with the main system, and anything could be the root of it, even a storage device. Take a friend’s storage device on loan, then see if the computer has begun to function.
5) Reduce CPU Temperature
Running your computer may lead it to shut down randomly, flashing a red light on your motherboard. It can be a result of your system overheating from constant depletion. To fix the red light issue, you must restrict the time programs use your CPU. You must adhere to the guidelines listed below to accomplish this:
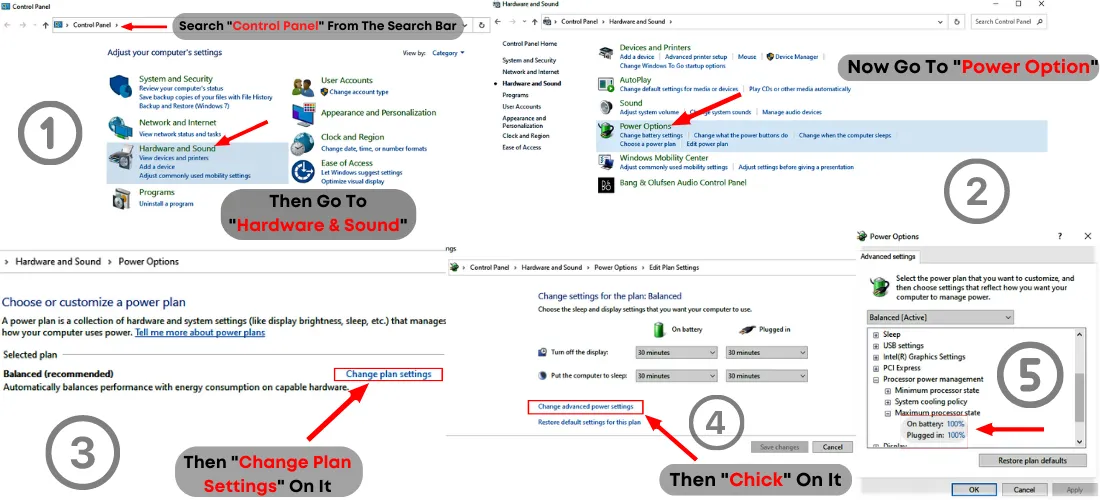
- Set up your device on a stable surface.
- Utilize a soft brush or cloth to remove the dust from the CPU’s fan.
- Verify whether the fan cable is securely connected to the motherboard.
- Check to see if the fans are functioning properly.
6) Unplug All Devices and Connectors
The likelihood that your work will finish is great because this is the final solution to your issue. You must now take out all the external connectors and accessories. Detach all devices, including the speakers, mouse, and keyboard.
Remove all cables but the ones for the power and display. Turn on the computer now. Has the system begun to boot up? If so, start connecting the peripherals and cables one at a time. You’ll learn which of them had the problematic connection by doing this.
Basic Input/Output System is the name for this system. On a chip inside your computer, this is essentially firmware. End users have occasionally claimed that their machine always starts in the BIOS when they switch it on.
Activate [Advanced BIOS Features] in the BIOS configuration. Select [Onboard] for [Init Display First]. Make [Onboard VGA] always enabled by changing the setting.
Go to BIOS >> Settings >> Advanced >> Power Management Setup, please. To turn off every LED on the motherboard, set the on-board function LED Control to [Off].


