The BIOS flashback is an excellent feature that very few motherboards offer. It allows you to update BIOS without needing RAM, CPU, or video card. You will only find it sometimes, except with some advanced motherboards. However, many manufacturers, including ASUS, MSI, ASRock, and Gigabyte, offer motherboards with BIOS flashback.
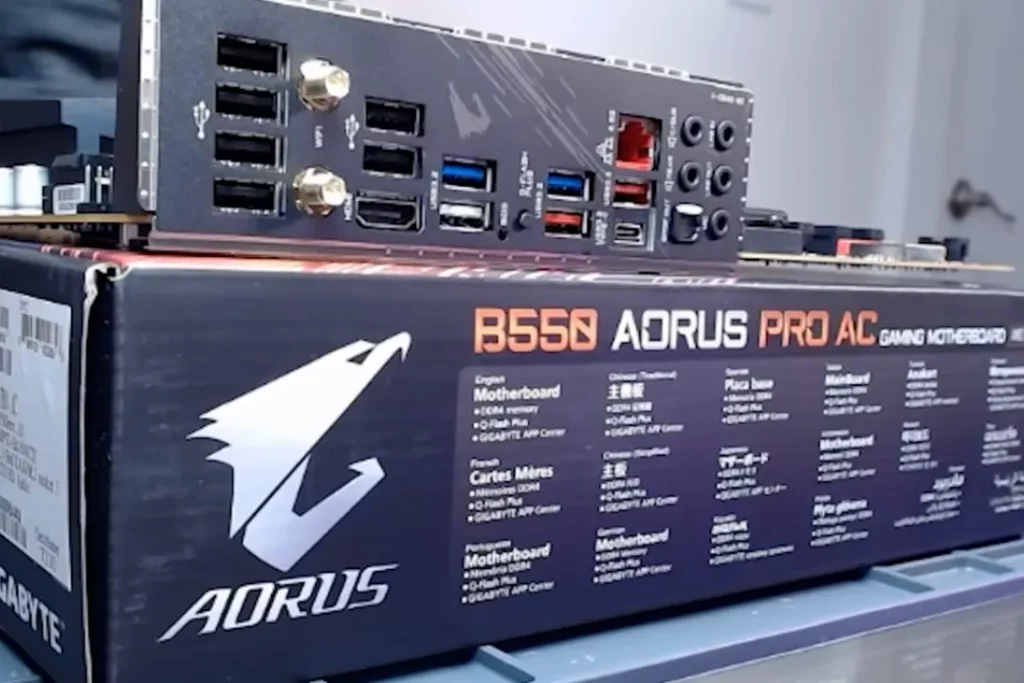
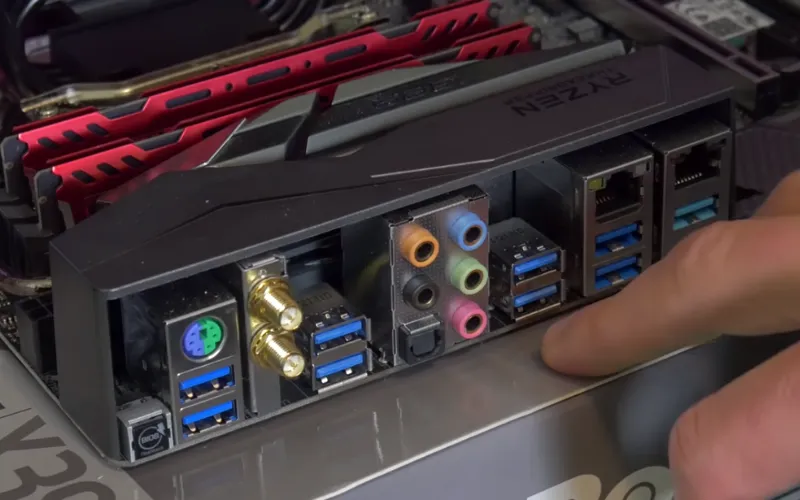
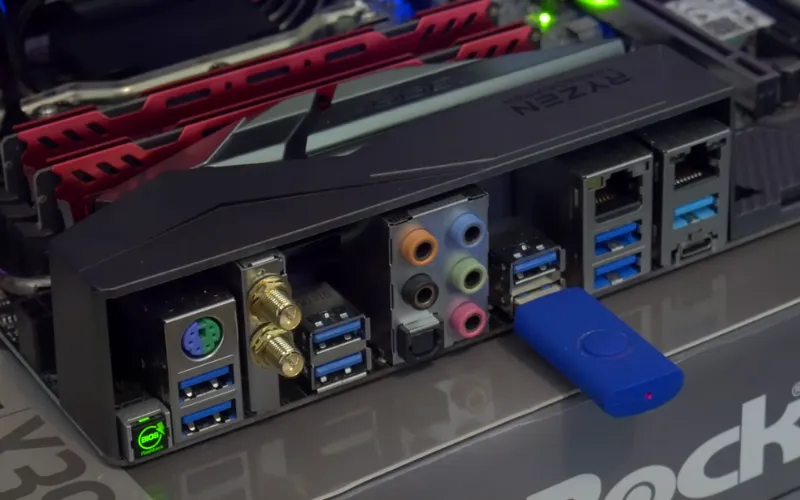
As I mentioned, not every motherboard has this feature and those that offer to submit a BIOS flashback button on the motherboard. You also get a specially designed USB port on the board. You can find it on the back of the PC chassis easily. However, you can also consult the manual for the ultimate smooth approach. There are certain conditions you need to use. When and how? I’ll explain each fact in detail below.
What is BIOS Flashback?
The BIOS Flashback is a great tool that helps users update motherboards without asking for help from RAM, GPU, or a CPU. You can only get it in some motherboards, but very few are currently available. However, the range of manufacturers is so wide to offer motherboards with such great features as BIOS Flashback. The USB BIOS flashback tool is no less than a blessing for those who have no memory backup and want to update BIOS.
If you ask, can you use BIOS flashback USB port? Yes, you can. And how to do so is a complete procedure to follow; you can find the guide below.
When to Use BIOS Flashback
There are multiple scenarios where you can go for BIOS flashback and how to use USB BIOS flashbacks; you will get the answer to this question later.
If BIOS is Corrupted
Suppose you find BIOS corrupt and need to use USB BIOS flash to get it back on track. Let’s follow the one-step guide below.
- You need to download the executable files first. Now, keep the executable file in the USB Drive, and press Enter to boot the PC BIOS
It is a simple method you follow only when the BIOS is partially corrupted. You can use the BIOS flashback if the BIOS is not working fully or even partly.
If NO RAM or CPU is Enlisted
Another scenario that may ask for the BIOS flashback is when you buy a CPU and find that it doesn’t support the motherboard, but you need to update the BIOS. Here you can go for the BIOS Flashback solution. BIOS flashback light stays on when you use it, giving you ample room to process BIOS updates without using RAM or CPU.
How to Use USB BIOS Flashback? 2 Methods
In this section, we’ll look for the methods you can follow to use USB BIOS flashback. I tried adding all the aspects in two techniques to get you a better understanding. There are no complicated and tricky ways, but they are as simple and easy. Let’s take a look at the points below.
Prepare A USB Drive
First prepare your USB Drive. Please format it with the FAT32/16 file. You can prepare the USB by following the steps below.
- Insert the USB Drive into the PC
- Now open the RUN BOX
- Type DiskPart in it and hit Enter
- Now to convert the drive into the MBR disk, after opening the diskpart.exe, choose Disk
- Before running this command, it is better to get a backup of the data
- Now type Convert MBR
After going through the steps above, you will get the USB Drive ready in prepared form. Now we’ll look for the method to use it. How to use USB BIOS flashback is another section, and we are yet to learn it.
Use the USB Flashback
Whatever the manufacturer is, you can follow the steps below. However, we are taking ASUS as a case and will tell you how to use USB BIOS flashback. There are no hard and fast USB BIOS flashback rules but some straightforward steps.
- First, you need to access the ASUS official website and download the BIOS file
- However, you need to get the file that creates a good match with your motherboard model
- Now you need to Unzip the BIOS file
- Double-click the BIOS Renamer
- It will rename the BIOS file as (.CAP)
- After renaming, now press any key to close the file
- Move the (.CAP) file to the root directory
- You need to ensure that the power supply is connected to the PC and PC is shutdown
- Connect the USB drive to the Flashback port. Press the Flashback button and the flashlight will blink three times
- It is a signal that tells you that the Falshbook is enabled
- When the procedure will complete, the light will go of itself
It is how you can update BIOS without any RAM or CPU. It is the pattern that you follow with ASUS. You will find some slight changes if using Gigabyte, ASRock, or any other.
Issues Occur Using BIOS Flashback
When using the BIOS flashback, you need to be aware of some issues that can come your way. Here I gathered some prominent ones to make you a pro user.
- If you find that the light is not on and it is not biking, you need to ensure that you have connected the USB Drive properly
- If the power supply goes off and everything goes out of the scene. You need to unplug the USB Drive, reconnect the power supply, and press the Flashback button again
- If the light doesn’t flash, you might haven’t unzipped the BIOS file and male it right away. Moreover, you can also unplug the drive and plug it all over again
These are some prominent issues you may encounter while using a USB flashback. Moreover, I have provided you with the solution to each problem. It is time to wrap up the topic with a final verdict.
Final Verdict:
If you ask, How to use USB BIOS flashback? I hope you got a clear explanation for this question. The USB BIOS Flashback feature helps you update BIOSZ without using memory,
CPU, and video card. It has many ways to do it and certain conditions when you use it. You can study them all above. Moreover, some issues may come your way while using it, and you need to be aware to avoid them timely. If I give you a brief time, that will go around eight minutes. Updating BIOS through BIOS Flashback will take up to this time if you follow the steps carefully. Moreover, you must prepare the USB Drive properly before you get or convert it to the MBR. However, the time duration may vary with the size of the USB drive system specs and the BIOS file size.
The answer is a big no. It cannot damage the motherboard physically in any case. However, if the process fails, it can make it unbootable. So, while using flashback, you must follow the sequence carefully to avoid failure. And if it fails, it will take some time to get it back on track, which will surely be irritating.


