When you overclock your graphics card to dangerous levels, GPU Artifacting frequently happens. The GPU’s high temperature won’t result in a crash or BSOD error, but it won’t display correct visual data, which means you’ll probably see flashes or pops on the screen that aren’t supposed to be there.
As your GPU ages, artifacts start to show up, and strange visual effects appear. Although it’s not just a problem with older cards, artifacts are also frequently seen in GPUs. The good news is that several solutions are available, including updating drivers and changing thermal paste and GPU clock speeds. Therefore, you need everything to know how to fix GPU Artifacting on a desktop.
What Causes GPU Artifacting?
Your GPU may be artifacts for various reasons, including overclocking, a broken graphics card, or issues with the VRAM. Have you ever questioned why your GPU is Artifacting? These artifacts typically appear when a user overrides the settings, making the computer run hot. In addition, issues with the VRAM and the GPU may also be at fault. Let’s see them in detail:
1) Overclocking
The main cause of these artifacts is overclocking. It is because overclocking puts additional strain on the GPU, and the only way it can manage the graphic settings you’ve applied is by compromising some portions of the screen to ensure the stability of the displayed image.
Most gamers attempt overclocking at least once, but the trick is to avoid becoming overly ambitious and thinking that the GPU can handle even more.
2) Damage Graphic Card
The artifacts may also be the result of a broken card. It could be physical damage or wear and tear from playing your favorite games for extended periods on high settings. Even though most GPUs today include a cooling system, if yours doesn’t, you can discover that the excessive heat within the case is damaging your card.
3) Problems with Drivers
Driver problems are the most typical source of GPU artifacts. Flickering, black, or white dots, lines, or squares are common signs that a graphics card isn’t operating correctly. The drivers for your graphics card may malfunction, resulting in artifacts produces by the graphics card.
The drivers for your graphics card regulate how it communicates with the computer’s other hardware and programs. Try going back to previous driver version if that doesn’t work. Ensure your graphics card uses the most recent drivers because older drivers occasionally cause problems.
4) Issues with the Power Supply
Can PSU cause GPU artifacts? One of the most frequent causes of artifacts on GPUs is problems with the power supply. Numerous issues, ranging from small artifacts to complete system failures, can be caused by power supply issues.
When the power supply voltage is too low, artifacts develop. Several causes may exist, but the power supply is frequently insufficient to support the GPU. A further frequent issue is an excessive voltage. An unreliable power source or an incorrect GPU configuration could be to blame for this.
5) VRAM Related Issues
The VRAM in your computer keeps track of several types of data. If this GPU component is damaged, it can result in distorted visuals. Search for color shifts to identify artifacts brought on by the video card RAM.
You can reduce the burden of GPU by eliminating some data that the VRAM uses. In other words, think about deleting stored games, games you no longer play, etc. If you don’t clean up the VRAM, especially after overclocking it, you could permanently damage it.
6 Easy Ways To Fix GPU Artifacting
GPU artifacts can be extremely annoying, especially when playing your favorite game. If you want your GPU artifacts disappear. Here are the methods to fix graphics card Artifacting not overheating:
1) Turn Off Overclocking
Restoring everything to its original settings is the easy fix if you are overclocking your GPU and notice these GPU Artifacts. While overclocking is entertaining, it is not optimal for the system to be constantly under stress
. You can check if the GPU still produces artifacts even at reduced performance levels.
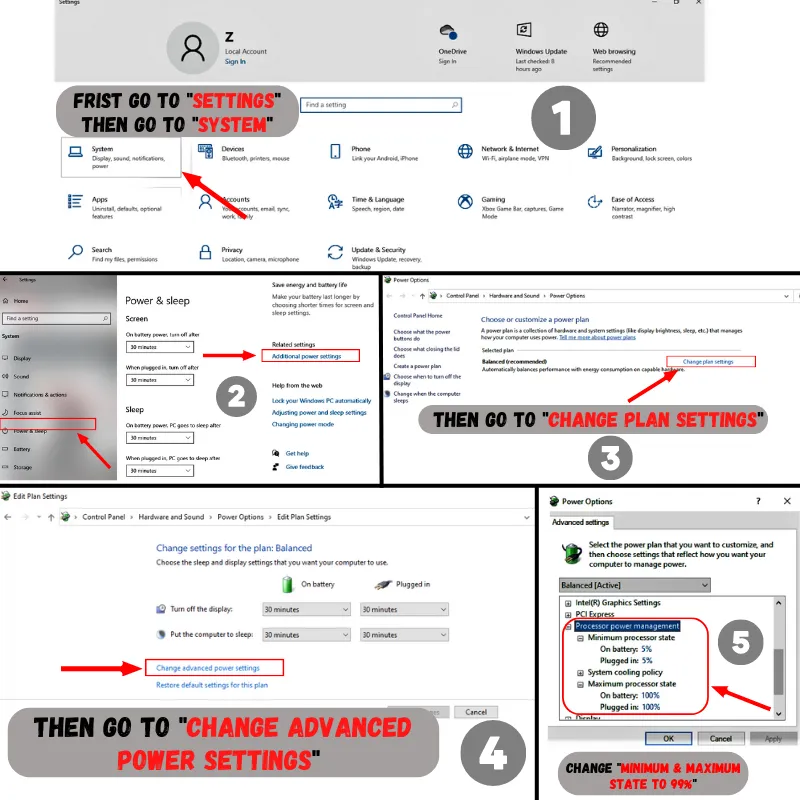
2) Monitor GPU Temperatures
Keep an eye on the GPU’s temps all the time. Verify that the fans are operating properly and turning on when the GPU temperature increases. Try adjusting the fan curves. Clean any dust from the fans and heatsink if you have an older GPU. You can also use the thermal compound to improve thermal conductivity between the GPU and the heatsink.
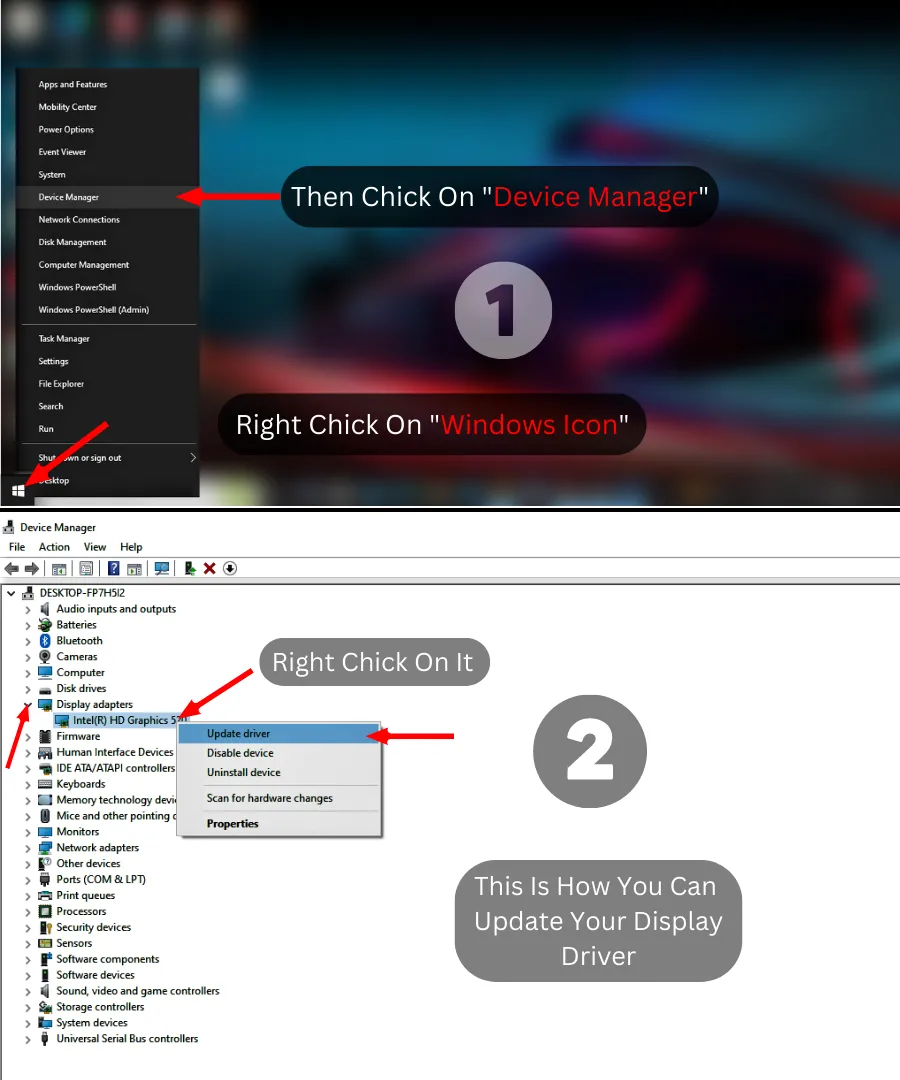
3) Update Drivers
Update your drivers for the simplest solution. The simplest method is to download GeForce Experience and use that to update your system each time you start a new game. Nvidia and AMD often release drivers that address bugs and problems that users have identified. Update the drivers, and then look at their support page.
You can also do this manually through your settings. By keeping your drivers up to date, you maintain your system, ready to handle any strain by the new, graphically demanding game you intend to play.
The simplest way to keep yourself from forgetting to do this is to check the GeForce Experience software each time you download a new game to see if any new drivers are available. It also applies to VR games.
Although updating drivers to the most recent version is a good idea, sometimes GPU artifacts can be caused by the most recent drivers. If GPU Artifacting appears after updating the driver, roll back to the previous version and check to see if the problem persists.
4) Verify Any Lost Connections
Your computer’s graphics processing unit (GPU) may be loose, which would explain the odd artifacts you see on your screen. All the connections should examine and, if necessary, tightened.
First, unplug the computer’s power supply. Next, unscrew the GPU’s mounting bolt and carefully pull it out. Apply a screwdriver to any loose connections to tighten them. After making sure that all connections are secure, reattach the GPU. Check if the artifacts are still present by turning on your computer and plugging in the power cable.
5) Clean the Dust
Dust is one of the most frequent sources of the issue, but there are many other potential causes. Check for dust and remove it if you find any if you believe it to be the source of the artifacts on your GPU.
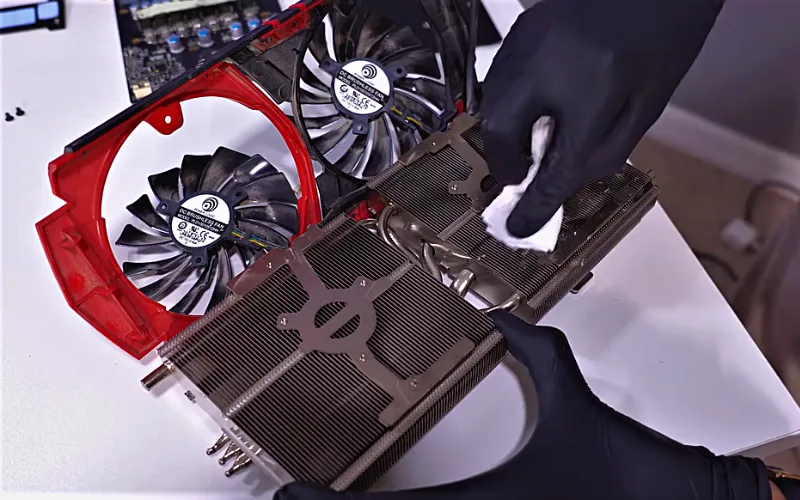
Simply visually inspect your GPU and look for any buildup of dust on the surface to check for dust. If you see any dust, blow it away with a blower. Check to see if the Artifacting has stopped after restarting your computer after removing all visible dust.
6) Determine Your VRAM Situation
How to fix VRAM artifacts? You’re out of luck if there is an issue with the GPU or VRAM’s hardware. Ask for assistance by getting in touch with the appropriate graphics card manufacturer.
They usually advise replacing the entire card rather than just fixing specific chips inside the cards. One way to reduce the load is to underclock, but if you discover that the VRAM is the problem, you’re having the most trouble with, it may be time to replace that card.
How Do I Check My GPU Health?
If you are worried about your GPU health, then follow these steps to check if your GPU is healthy or not:
- Start by hitting the Windows key + R, entering dxdiag, and pressing Enter to launch the DirectX Diagnostic Tool.
- Doing so will open a window containing details about your graphics card, including its name and model number.
- You may get a list of your card’s graphics features under the Display tab. If any of these mark as Not Available, your graphics card is malfunctioning.
- You can also utilize the Windows Display Settings to test your graphics card.
- Press the Windows key + I to launch the Settings program, then click System.
- After choosing Display, navigate to the Advanced display settings area by scrolling down.
You should be able to see details about your graphics card here, such as the name and model number. There might be an issue with your graphics card if you can’t see this data or the graphics settings are on Low. In that situation, ensure you have the necessary graphics card drivers installed first.
Driver problems frequently cause GPU artifacts. Artifacts on the screen are a typical sign that the graphics cards aren’t operating properly. These abnormalities appear as flickering dots, lines, or squares in either black or white. Drivers frequently cause GPU artifacts.
Although the artifacts you see on the screen may not always last, if you notice any form of artifacts, you may be overtaxing the GPU and risk lasting harm. These artifacts include eerie skylines and some objects showing up in unexpected places. The artifacts might then last forever as a result.
In some situations, dust or another material buildup on the GPU’s heat sink or fans might result in artifacts. This inadequate cooling could lead to the GPU overheating. Hardware issues like malfunctioning RAM or a bad graphics card can also result in artifacts.
GPU Artifacting can appear in many different forms, such as bizarre lines in the distance, odd-looking textures, screen flashes, etc.
You should direct some air toward the graphics card depending on how well the air is flowing in your case. Damaged GPU RAM may bring on artifacts.
Display artifacts in the BIOS pointing to a problem or defect with your GPU card. I can’t rule those possibilities out, but they seem unlikely at first glance. The CPU might install incorrectly or defective, and the DDR4 might be incompatible, misconfigured, or defective.


