If you accidentally look at the back of your computer, you will see many ports located there. All of these ports on the motherboard are specifically designed to perform one specific task. One of them is the HDMI port. The HDMI port on the motherboard is automatically disabled if you are using a graphics card.
Here we will show you how to enable the HDMI port on your motherboard. Enabling it will permit to connect multiple monitors screens via an HDMI cable. Almost all motherboards have an HDMI output on the back.
However, not all processors have integrated graphics. Your processor has it, but you can’t see anything on the screen, so your HDMI port may be disabled. It doesn’t matter if you want to use the HDMI port on your motherboard for your primary or secondary display.
It’s also great to add a new monitor, but your graphics card only has one HDMI port, and you don’t want to buy an adapter. So how do you enable HDMI on the motherboard? After all, why waste money when you can make it work for free?
This article will discuss the benefits of using the motherboard HDMI port and all the steps required to enable the motherboard HDMI port. Here are all the steps you need to follow if you want to enable the HDMI port.
TABLE OF CONTENT
- How to Enable HDMI Port?
- How to Enable Motherboard HDMI on MSI?
- Impact on the Performance of Dedicated + Integrated Graphics
Follow the Steps
How to Enable HDMI Port?
The HDMI port on the motherboard is automatically disabled if you are using a graphics card. To turn on the HDMI port of your motherboard, follow the steps below.
1) Test the Onboard Graphics on the CPU
- First of all, make sure your CPU has onboard graphics. The reason is that integrated graphics, not your GPU, powers your motherboard’s HDMI port. To do this, you can open Settings in Windows 10. Next, select “System” and then “About”.
- Check the CPU model installed behind the processor.
- Search Google for the name and model number of this processor. Then open a website that mentions CPU specifications.
2) Enable Integrated Graphics in BIOS
- Now, you need to enter BIOS and enable integrated graphics. To do this, save all your work and restart your PC Build.
- Then press the key while restarting the computer to start the BIOS. Standard keys for these actions include Escape, Delete, F1, F2, and F12. Next, please select it and press Enter. You may need to confirm to enter the section.
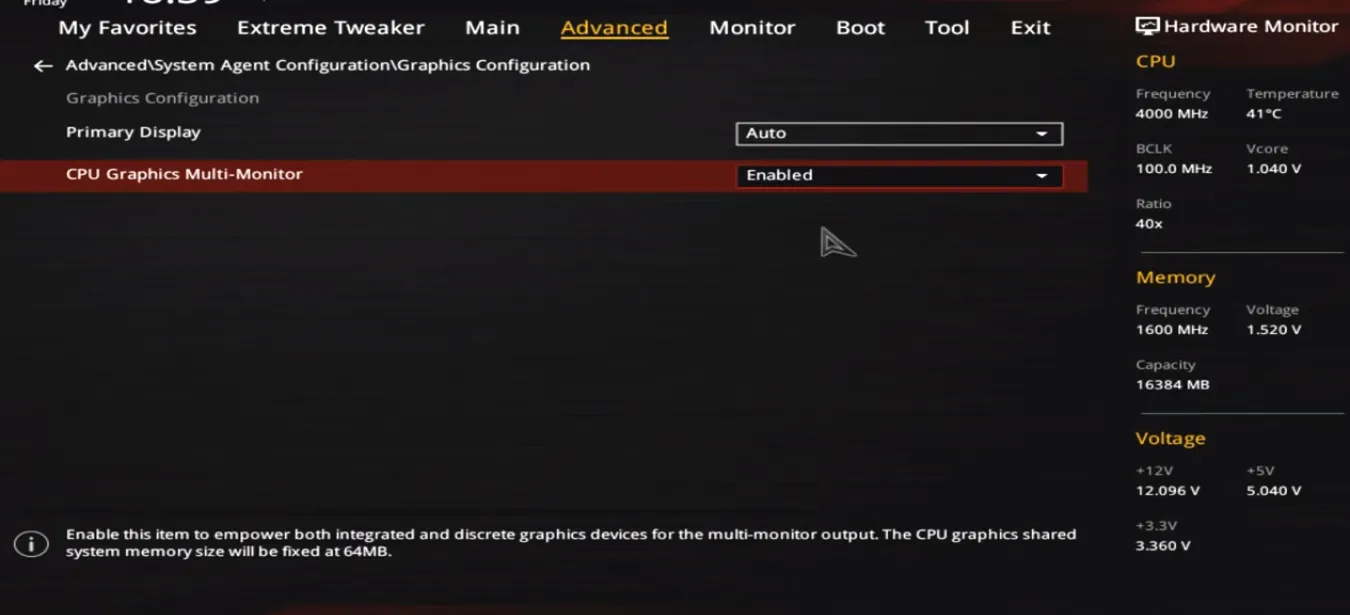
- In the “Advanced Settings” section, find “System Agent Settings”, enter it and select “Graphics Settings”.
- Look for the option named “Enable GPU, Integrated Graphics, or Multi-Monitor IGPU”. It may have been disabled.
- Enabling this option will enable the motherboard HDMI. Once you’ve done that, save your changes and hit Enter to confirm.
- Restarting the computer ensures that the changes take effect.
3) Connecting the Monitor

- Connect the primary monitor to the HDMI port on the back of the video card. Then connect the secondary display to the HDMIU port on your motherboard.
- Connect the other end of the HDMI cable to the respective displays.
- When you start Windows, your monitor will be detected. You might want to set up your monitors correctly. To do this, right-click on the desktop and select Display Options.
- In the menu, you can adjust various display-related options, such as rearranging their arrangement.
4) Install the Latest Version of Integrated Graphic Designer
- Open Device Manager in Windows. In the Other Devices section, look for unknown devices.
- Install the latest driver from your processor manufacturer’s website, or let Windows automatically find the correct driver.
- Restart the computer and wait for the secondary monitor to be detected.
How to Enable Motherboard HDMI on MSI?
Unfortunately, hardware failure can also cause HDMI problems on MSI motherboards. Since some graphics cards are as expensive as the motherboard itself, replacement costs can be high in a component failure.
MSI’s HDMI is used via a motherboard onboard graphics card. Ensure the card is seated correctly on the board and that the appropriate power cable is connected to the card before assuming that the card itself is faulty. If your motherboard uses a built-in HDMI connector, check the area around the graphics chip for burnt, chipped, or cracked hardware, which indicates damage to the hardware.
Benefits of Using an HDMI Motherboard:
The most significant advantage of using a motherboard HDMI port is the ability to connect multiple monitors. If you don’t have a second HDMI port on your graphics card, or if all of your ports are busy, you can plug the new program into your motherboard.
Even if you have a three monitor setup and all three HDMI ports on your graphics card, you can also hook up your TV for fun joystick games or watching YouTube. Connecting multiple monitors has several advantages.
It will speed up your workflow, increase productivity, speed up multitasking, and more. Since most people work from home due to the ongoing pandemic, being more productive will help you spend more time with your family and relaxation.
And if you’re a gamer, having a second monitor to track your hardware usage, or perhaps having an open wiki, is a great idea. For example, if you’re playing Cyberpunk 2077 and are constantly using your phone to learn about the game, a second monitor will speed things up if it can withstand the least performance impact caused by RAM usage.
The advantage of using integrated graphics is that it decreases the load on the graphics card when you need to run two monitors. On the other hand, this usually means you have more VRAM to work with, which is especially important these days since many games have high-resolution textures.
Cons of Using an HDMI Motherboard:
The main disadvantage, as opposed to using dedicated graphics for both monitors, is that you cannot play games in multi-monitor mode. At AMD, you’ll have to sacrifice Eyefinity technology, which has its advantages.
Also, you will notice that your integrated graphics use some of the system RAM. This is because the integrated graphics, unlike the dedicated GPU, do not have a separate VRAM. This is a big problem for users with 4 GB or even 8 GB, but those with 16 GB or more probably won’t notice the motherboard HDMI not working.
Impact on the Performance of Dedicated + Integrated Graphics
Using the motherboard’s HDMI port is a great idea, especially if you don’t have free ports on a Dedicated Graphics card instead of using your graphics card for all monitors. In truth, using your graphics card for all monitors is slightly better in terms of usability and performance, but using the motherboard’s HDMI port isn’t too bad either.
Your Integrated GPU is dependent on system RAM, so you will see slight changes depending on what you do. For example, you won’t see more than 1GB of RAM when watching a 1080p video. But if you want to play two games simultaneously, then the performance will largely depend on the power of your computer.
Comparison of All GPU Performance
Turn off the secondary monitor if you are playing a game and want to get the most out of your system for the best possible FPS. Your integrated graphics will go to sleep. Then, when you’re done with an intense gaming session, be sure to plug your monitor back in.
We hope our article can help you successfully enable the HDMI port on your motherboard. Unfortunately, many motherboards permanently disable the motherboard’s HDMI port if you have a graphics card plugged into any PCIe slot. Therefore, you will need to check your motherboard BIOS or manual to make sure it supports onboard graphics along with dedicated graphics.
FINAL WORDS


